Overview
The Auto Attendant serves as a receptionist that answers the phone and routes calls to various destinations, employees within your company, and specific groups of employees, voicemail, or other outside numbers. They provide callers with your company greeting and dialing menu options. Each Auto Attendant can be assigned a DID and/or extension for identification and setup purposes.
The Auto Attendant has three modes – one for business hours, one for after hours, and one for holidays. Each mode allows administrators to setup options 0-9, #, and * to present callers with different options from which to select.
- To route callers to another set or branch of options, configure sub menus within the Auto Attendant.
- To route calls based on the time of day (e.g. after hours versus traditional business hours), configure an Auto Attendant schedule. To identify the dates of holidays your company recognizes, configure a company holiday schedule. On designated holidays the Holiday greeting and menu dialing options are played to callers.
- If a unique message is required, greetings may be uploaded to the Announcement Repository as a .wav file or recorded from the Voice Portal.
- For instructions on how to record your Auto Attendant greetings from the Voice Portal, please reference the Voice Portal Quick Reference Guide.
- All greetings must be formatted as CCIT u-Law 8.000kHz, 8-bit Mono .WAV with a maximum file size of 2,000 KB or about 4 minutes of recording.
The Auto Attendant uses two schedules – a “business hours” and “holiday” schedule – to determine whether to apply Auto Attendant options defined for the business hours mode, after-hours mode, or holiday mode. To learn how to manage the Auto Attendant’s Time Schedules, please reference the Schedule Quick Reference Guide.
- To run the same greeting at all times of the day (i.e. one mode 24×7), select Every Day All Day as your business hours schedule and configure the desired option within the Business Hours Menu.
Group administrators can fully configure the Auto Attendant to meet the specific needs of their organization. Configurable options include:
- Allow/Disallow Direct Extension Dialing – Provides ability for callers to dial a known extension at any time to connect with the user, without requiring additional prompts
- Group Wide or Department Specific Dialing Options – Refines the list of available users and extensions to include with the Internal dialing options
- Schedule – Defines Days/Hours for normal business operations, as well as holidays. Supporting distinct greeting messages and routing actions for Business Hours, After Hours and Holidays.
- Routing Actions
- Transfer with prompt – Routes callers to a configured phone number or extension after playing the recorded name of the user’s seat.
- Transfer without prompt – Routes callers to a configured phone number or extension.
- Transfer to Operator – Routes callers to a configured operator. The designated operator will receive all calls that time out if the caller does not choose an option from the Auto Attendant.
- Transfer to Submenu – Routes callers to a configured submenu.
- Name Dialing – Enables callers to dial by a recipient’s name.
- Extension Dialing – Enables callers to dial by a recipient’s extension.
- Transfer to Voice Mail – Routes callers directly to the voice mailbox assigned to the auto attendant.
Note: To transfer to another internal mailbox, select Transfer without prompt and enter *55 followed by the mailbox extension.
- Play Announcement – Plays a configured audio announcement.
- Repeat Menu – If selected, this option will repeat the greeting and menu options.
- Exit – Allows a caller to exit the menu system. This will terminate the call.
Example
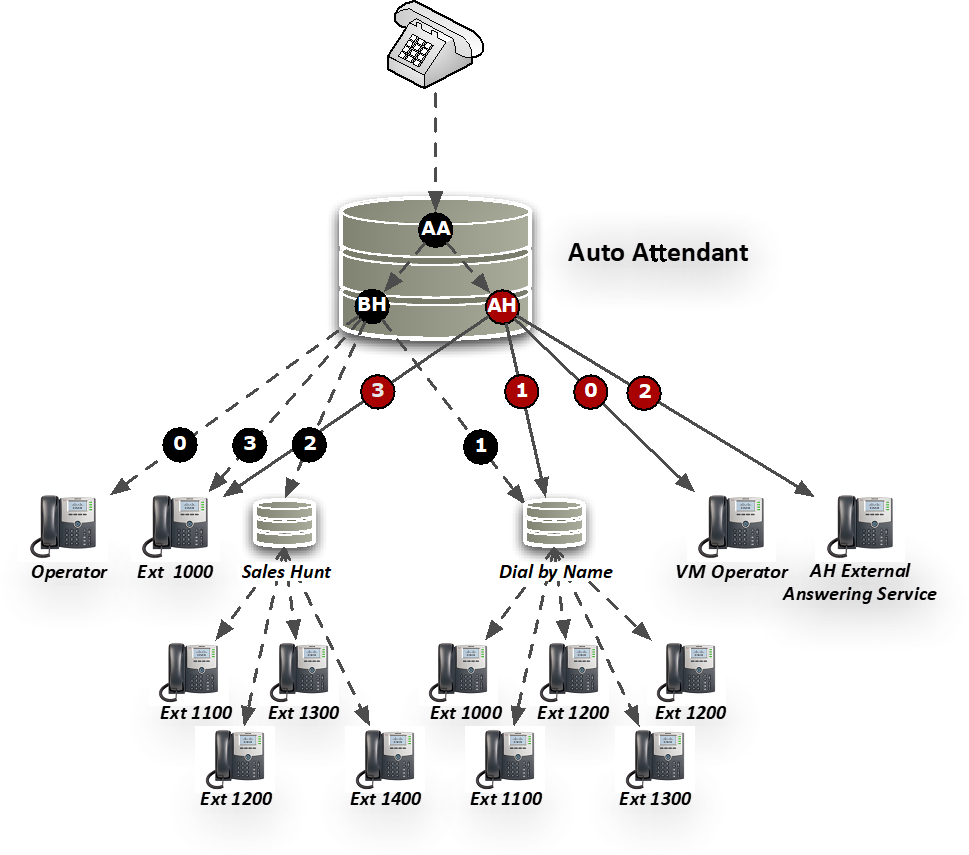
- A call is received into the Auto Attendant phone number or extension
- The Auto Attendant answers the call and plays the appropriate greeting based on the time of day
- Caller then makes a selection by entering digits on their phone
Business Hours
0. Rings Operator
1. Accesses Dial-by-Name directory
2. Rings sales team’s Hunt Group
3. Rings to specific extension
After Hours
0. Route to Operator’s Voicemail
1. Accesses Dial-by-Name directory
2. Rings third-party answering service
3. Rings to specific extension
Feature Prerequisites
Before the Auto Attendant service can be used the following condition must be met:
- At least one active DID or extension must be assigned to the Auto Attendant.
Feature Setup
- Go to the group admin dashboard.

- Go to the Auto Attendant service.

- Click the plus button to create a new Auto Attendant.

- Fill out Required tab fields:
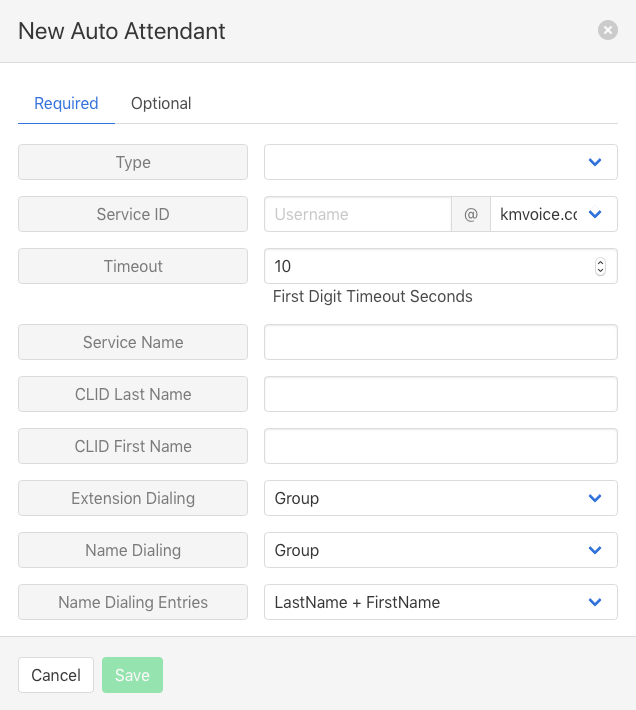
- Service ID – Sets the unique ID of the Auto Attendant Service ID
- Timeout – Determines how long until an idle caller is automatically forwarded to the operator
- Service Name – Name of the Hunt Group
- CLID Last Name – Last Name to be shown when presenting calls to users
- CLID First Name – First Name to be shown when presenting calls to users
- Extension Dialing – Scope of users that callers can direct dial from the Auto Attendant
- Name Dialing – Scope of users that callers can contact via the dial by name directory
- Name Dialing Entries – The order in which name dialing queries can be made by the caller.
- Click Save to retain changes.
- Fill out Optional tab fields:
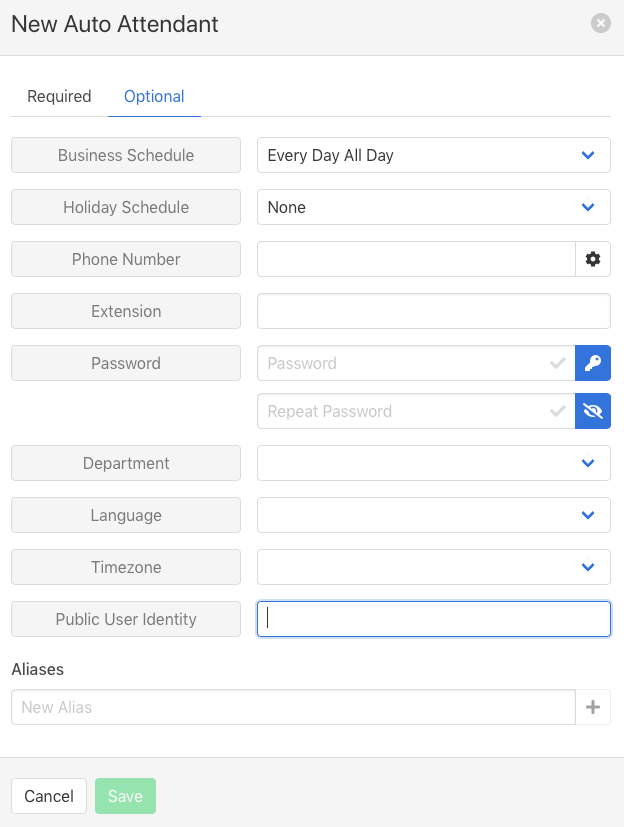
- Business Schedule – Selects schedule to determine when the business hours menu will be active
- Holiday Schedule – Selects schedule to determine when the holiday hours menu will be active
- Phone Number – Assigns number that will route to the auto attendant
- Extension – Assigns extension that will route to the auto attendant
- Password – First Name to be shown when presenting calls to users
- Department – Scope of users that callers can direct dial from the Auto Attendant
- Language – Scope of users that callers can contact via the dial by name directory
- Time Zone – The order in which name dialing queries can be made by the caller
- Click Save to retain changes.
- Configure menus.
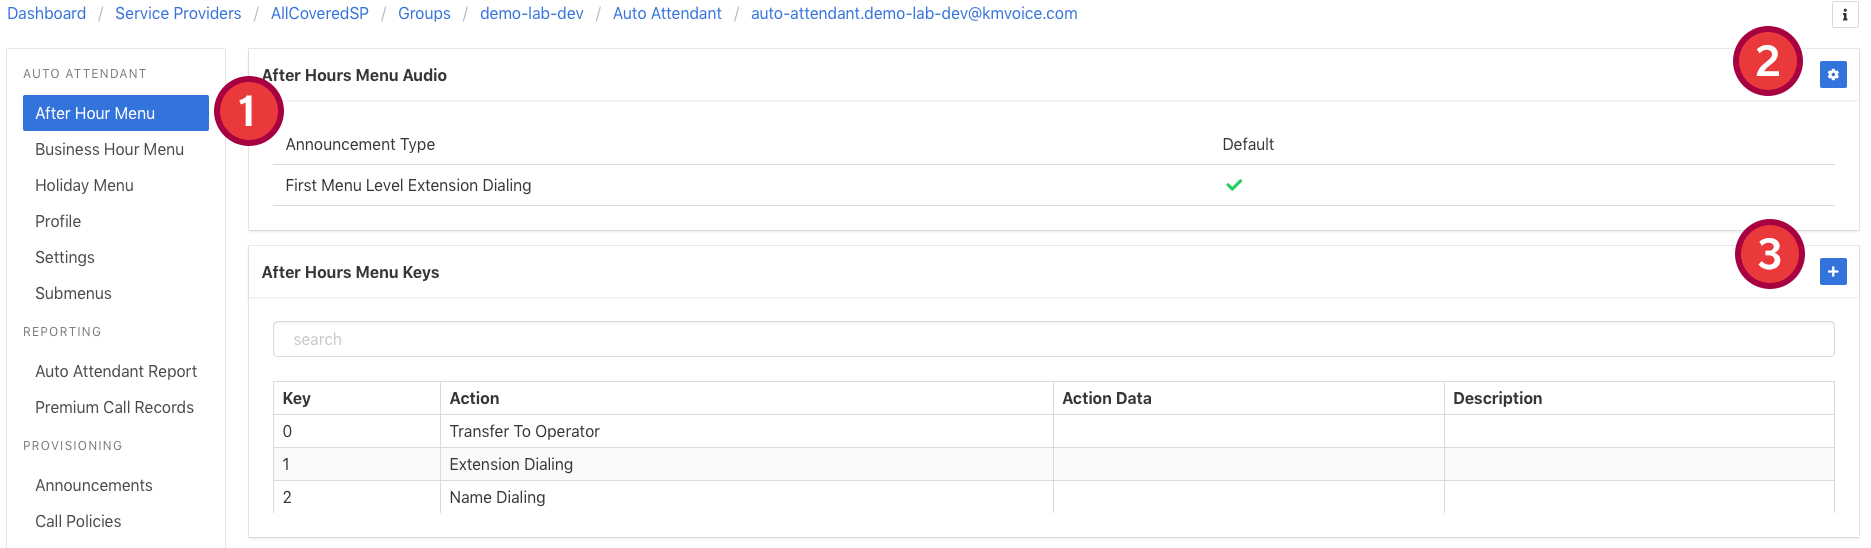
- Select a menu to edit.
- Click the gear icon to choose an audio recording for the menu greeting or to enable/disable extension dialing at the root of the Auto Attendant.
- Click the plus icon to set Key behavior options.
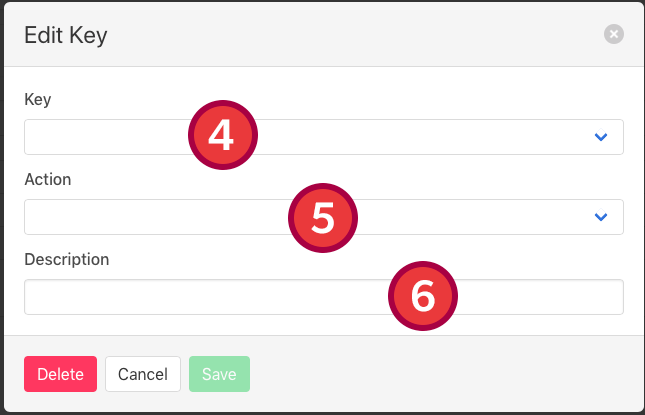
- Select the key option you want to add.
- Choose the action you want to occur when dialers select the chosen key and fill out necessary action details.
- Enter a description.
- Click Save to retain changes.
Recording Greetings
Greetings can be assigned to auto attendant menus either by uploading an existing audio file or by recording a new greeting directly from the voice portal. To record a Business, After Hours or Holiday greeting using the Voice Portal:
- Dial your voicemail access number or press the voicemail button on your phone.
- When you are prompted for your passcode, press the * (star) key.
- Enter the Voice Portal Access Number then press # (pound).
- Enter the passcode for the Voice Portal. It may prompt you to change this. Please note your new passcode for future use.
- Press 1 to change an Auto Attendant Greeting.
- Enter the extension of the Auto Attendant you would like to modify (if multiple Auto Attendants are available).
- From here you can change the Business or After-Hours Greeting.
- Press # to save your recording.
Submenu greetings must be altered from the administrative portal. To update a submenu greeting using your desk phone to record:
- Dial your voicemail access number or press the voicemail button on your phone.
- When you are prompted for your passcode, press the * (star) key.
- Enter the Voice Portal Access Number then press # (pound).
- Enter the passcode for the Voice Portal. It may prompt you to change this. Please note your new passcode for future use.
- Press 5 to record a new announcement
- Once your announcement has been recorded you will need to navigate to the submenu via the admin portal and select the newly recorded announcement in the submenu audio settings.