Overview
The Voice Messaging User service enables voice messaging on a user seat or virtual user service. This guide explains there various options available when configuring voice messaging.
Feature Prerequisites
- Users must have a one of the following service packs in order to use the Voice Messaging User service.
- Basic Seat
- Standard Seat
- Premium Seat
- Virtual User Services (Hunt Group, Auto Attendant, Call Center, etc.) automatically have this service available when the virtual user is created.
Feature Setup
- Go to the group admin dashboard.

- Select the user or service on which you want to configure voice messaging.

- Click Service Settings in the left column navigation.
- Select Voice Messaging User from the services list.
- Select the Settings tab and click the gear icon to configure general voice mail settings

- Enabled – Activates the voicemail service
- Enable Phone Message Waiting Indicator – Turns the message waiting light feature on for any desk phones connected to the user
- Send Voice Message Notification Email – Allows an email to be sent with a notification anytime you have a new voicemail
- Send Carbon Copy Voice Message – Can be set to send a copy of your voicemail message as an audio file via email. When enabled, you can enter the desired email for delivery in the Carbon Copy To field.
- Transfer on Zero – Allows users to dial 0 during the voicemail message greeting and then be transferred to another number or extension. The desired transfer location can be entered into the Transfer To field.
- Always Redirect to Voicemail – If enabled, all calls will go straight to Voicemail
- Redirect Busy to Voicemail – If enabled, all busy calls will go straight to Voicemail
- Redirect No Answer to Voicemail – If enabled, all unanswered calls will go straight to Voicemail
- Processing – The processing type selected determines how voicemails will be delivered
- Unified Voice and Email Messaging – This will send voicemail to phones, Webex apps and to the Carbon Copy To field
- Deliver to Email Address Only – This will ONLY send voicemails to the Delivery Email address. Voicemails will NOT go to phones or Webex applications.
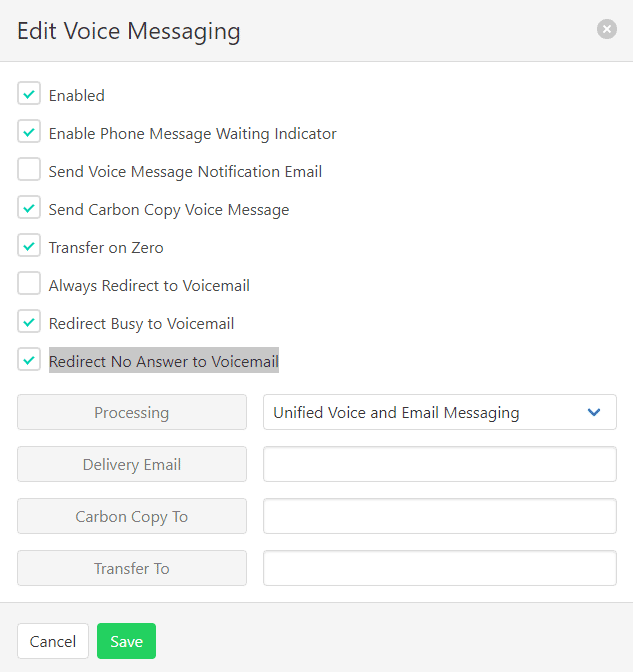
- Click Save to retain changes.
- Click the Voice Portal tab and then the gear icon to access voice portal settings.
- Click the gear icon beside Portal Passcode to reset their voicemail passcode
- Click the gear icon beside Voice Portal to configure voice portal preferences
- Auto-login When Calling From Your Phone – Prevents the portal from asking for a passcode when calling from the user’s desk phone or Webex
- Use Personalized Name – Enables the use of your recorded name within default greetings. New name recordings can be uploaded here as well.
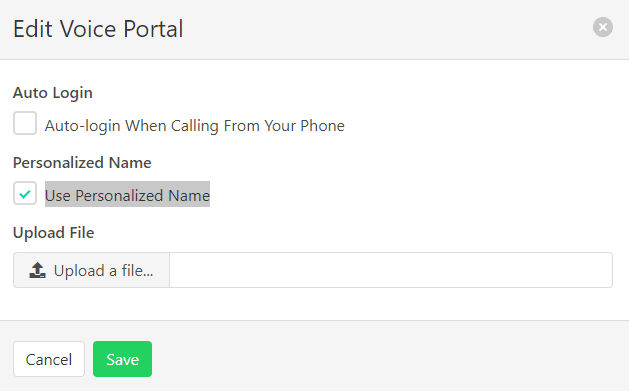
- Click Save to retain changes.
- Click the Greetings tab and then the gear icon to access greetings settings
Message Deposit- Disable Message Deposit – Stops voicemails from being left in the voicemail box
- Announcement Selection – Determines whether the greeting uses the default audio or personalized audio selected in the Personal Greeting field
- Extended Away Enabled – Sets the standard away greeting and settings to override the settings under No Answer.
- Extended Away Disable Message Deposit – Stops voicemails from being left in the voicemail box while Extended Away is enabled.
- Extended Away Greeting – Selects the greeting used while Extended Away is enabled.
- Rings before Greeting – Sets the number of rings before voicemail pickups up an incoming call.
- Announcement Selection – Determines whether the greeting uses the default audio or personalized audio selected in the Personal Greeting field
Allows you to save alternate greeting for later reference. They still must be assigned following the above steps for callers to hear them. - Click Save to retain changes.